How I blog
It’s been just over a year since I started this blog, so it seems like as good a time as any to run through my writing and publishing process.
The early days
Starting out, I just wanted an uncomplicated workflow that let me focus on writing. My only real requirement was that the tools I used were free software.
Enter Ghost: a slick, minimalist, open source blogging platform. It did everything I wanted it to. It was simple, but pretty. It got me blogging. And by using the GhostPro hosting service, pretty much everything was sorted from the start. Admittedly, it was expensive1, but I justified the cost by thinking of it as motivation to write more (it worked!). And anyway, since Ghost’s source code is open, I could switch to self-hosting later on when I was feeling more comfortable with the whole blogging thing.
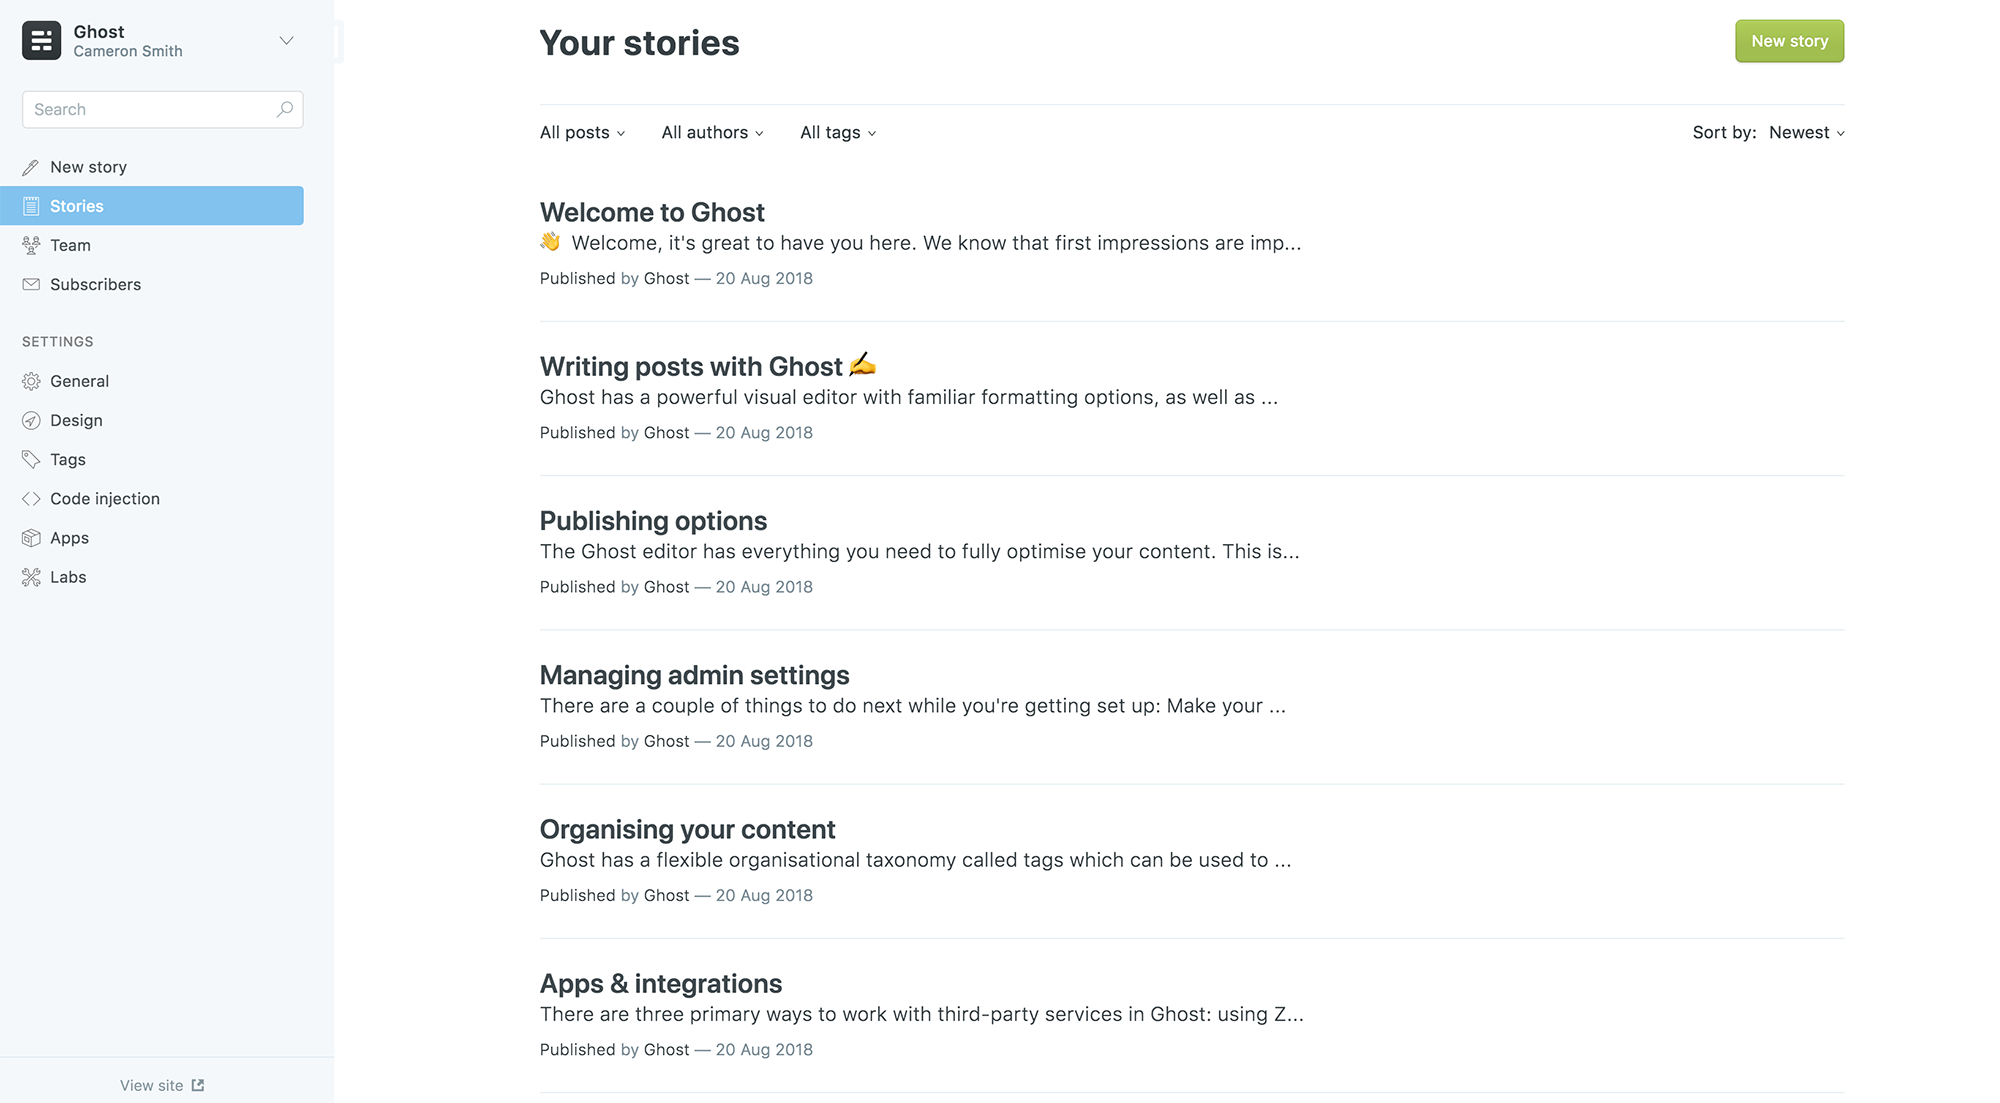 A view of the super clean Ghost dashboard. Image via ghost.org.
So, until recently I was writing posts in Markdown, Ghost’s markup language of choice, logging into my Ghost account, pasting my work into the web editor and then hitting Publish. What could be simpler?
This was all well and good until my annual GhostPro subscription came up for expiry.
At this point, although I had already begun researching self-hosting with Ghost, I was interested in branching out. This was an opportunity to optimize my site/workflow even further. Wouldn’t it be nice to switch to a static site? And instead of copying and pasting posts into a web interface, could I edit and publish without leaving my text editor? And so began my journey down the rabbit hole.
Now
I currently blog using a combination of GNU Emacs, Org mode, Hugo. Here’s a quick rundown of what those components actually are:
- GNU Emacs – a crusty2, magnificent text editor from the 80s.
- Org mode – an Emacs mode for organizing things and creating documents. Has its own markup language similar to Markdown.
- Hugo – a static site generator.
With this combination of tools, I can seamlessly write/edit posts, preview how they’ll look on my website and publish the finished result in a few keypresses, all from my text editor. I’ll go into each component in detail in the following sections.
As for the process of writing itself, it’s the same for me as it is for everyone else. Much more painful, much more time-consuming and much less romantic than you think it’s going to be.
Emacs
Emacs is a text editor. Emacs is weird. Despite still being in active development, with more users than ever, it looks old. It has lots of strange keybindings, and the ones you’re already familiar with (things like C-c and C-z for copy and undo) behave differently. The print edition of the manual is 631 pages. To many people it sounds like a nightmare.
But I love it.
Not because it’s arcane and esoteric – quite the opposite. I love it because it’s intuitive. Emacs was built for editing plaintext and it’s really good at it. Once you’re past the initial learning curve, you start to see it has it’s own internal logic, almost like a second language when you’ve studied it for long enough. Moreover, it’s completely hackable, so anything you don’t like can be tweaked and improved.
It’s also incredibly powerful. Currently, I use Emacs to read/write email and blog posts, create documents, generate weekly agendas and interact with my filesystem. If it involves text in any way, I do it in Emacs. And this is only scratching the surface of what I could be doing.
However, this isn’t a post about Emacs specifically, so I’ll leave my explanation at that. It should be noted, though, that what enables much of Emacs’ crazy functionality is a feature called Org mode.
Org mode
Org mode has two main functions: organizing information hierarchically, and exporting files written in Org’s markup language to different formats (e.g. PDF, HTML, Markdown etc.).
Org mode works with files that have the .org suffix. These are plaintext files written in Org’s markup language, similar to Markdown. To demonstrate:
Some boring text, [[https://example.org][a link]] and a list:

- =monospace text=
- /italics/
- *bold text*

A bit more regular text.

---
Ends up looking like:
Boring regular text. A link and a bulleted list:
monospace text- italics
- bold text
A bit more regular text.
Of course, there’s a little more to it than that, though I don’t have space to go into detail here. There’s a ton of Org mode tutorials online if you’re interested in learning more.
In my case, I have one gigantic file called blog.org, which contains all my posts. This file is the only thing I need to touch when I’m working on my blog.
Why one enormous file? Isn’t it a pain to navigate and edit and search through?
Surprisingly, no. The hierarchical structure of Org files means that you can easily single out sections to display or edit.
Say I want to work on this post. After opening the file, I’m presented with this:

Not much to see here. Just a bunch of headings or trees. Trees can have subtrees, and those subtrees can have subtrees, and so on. The contents of a tree can be revealed by moving the cursor to it and hitting Tab.
Here’s what happens when I reveal the contents of * Blog.

Ah, now we’re talking! All my posts are here. At this stage it’s easiest just to search for the post title. In fact, the fastest way to find your post is to use the search function as soon as you open the file. You don’t need to reveal a tree or its subtrees to search their contents.
And now I get to what I’m after – the content of the post! Again, hitting Tab reveals the contents of subtrees.
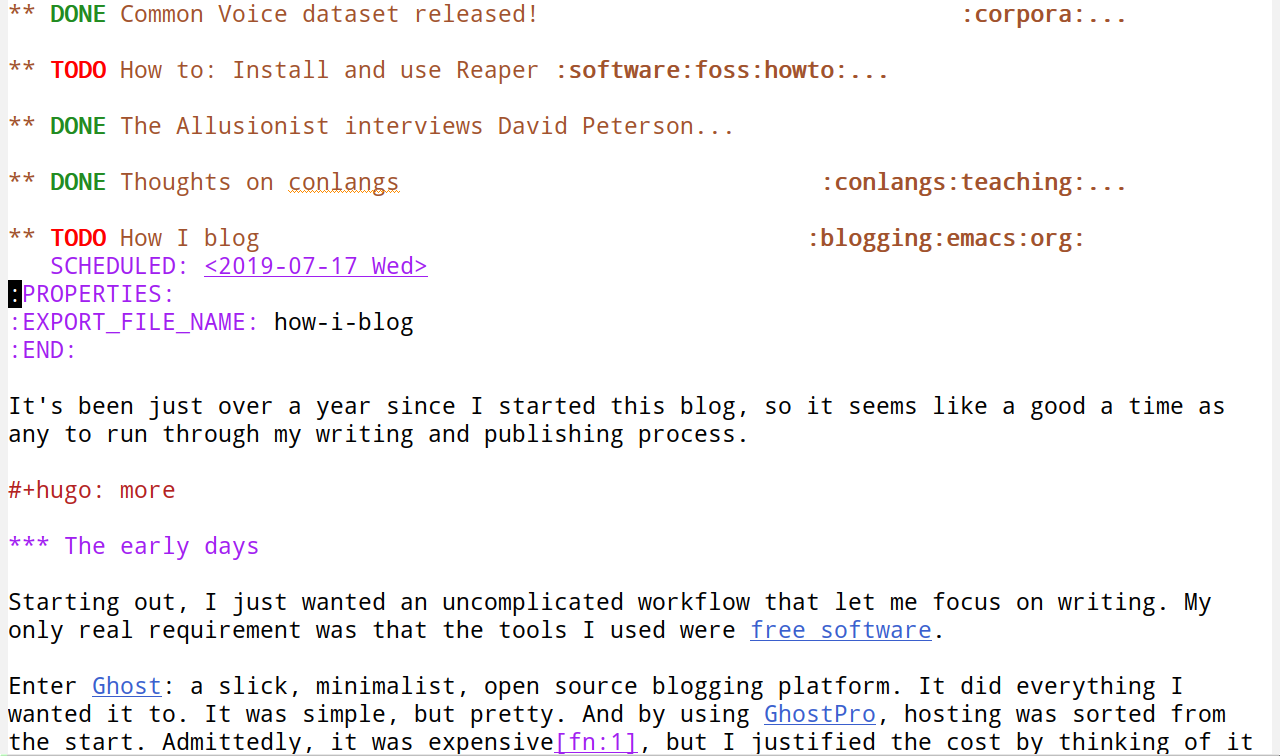
Neat, but the post is still sandwiched between a whole lot of text I’m not interested in. When I search or navigate between sections, I don’t want to end up somewhere else, unwittingly modifying a post that’s already been published. To solve this, I can do something called narrowing.
By hitting C-x n s (remember what I said about weird keybindings?) the current subtree (i.e. the current post) becomes the only thing on the screen. The view has been narrowed. All changes made to the post are saved in the same giant file as before, but I can only see and interact with the narrowed version. Searching and checking the word count, for example, only apply to the current subtree.
Exporting with ox-hugo
Once the post is written, it needs to be exported to a set of files that Hugo (see below) can work its magic on. For this, I use ox-hugo – an Emacs package which does the following:
- Converts the Org markup to Hugo-compatible Markdown3.
- Generates the frontmatter (i.e. metadata) for each post.
- Chops up the giant Org file so that each post’s subtree is its own file.
To export, I hit C-c C-e to bring up a list of export options, followed by H A to export all trees with ox-hugo.
Here’s where Org’s document structure comes in handy. Remember those first two trees * About and * Blog? Well whaddya know – they correspond to the site’s structure! And look, all of * Blog's subtrees are posts in the Posts section!
Hugo
Hugo is a fantastic tool for generating static sites. Here’s a quick refresher for anyone who’s shaky on what a static site actually is. A static site is simply a collection of files on a server that can be accessed by visiting the URL. A very basic webpage can just be an HTML file, but generally there’s some CSS (think: pizzazz) and JavaScript (think: witchcraft) to make things nicer/more interactive.
What’s the advantage of static sites over dynamic sites? In no particular order, static sites are: faster, more secure, cheaper to run, less resource intensive and easier to maintain. Plus, self-hosting is a breeze if you’re just serving up static pages.
In Hugo’s most basic usage, all you need to do is navigate to your site’s directory in a terminal and run hugo. This generates the site locally. Yup, it’s that simple. Nothing’s online yet, but it’s all ready to be beamed up.
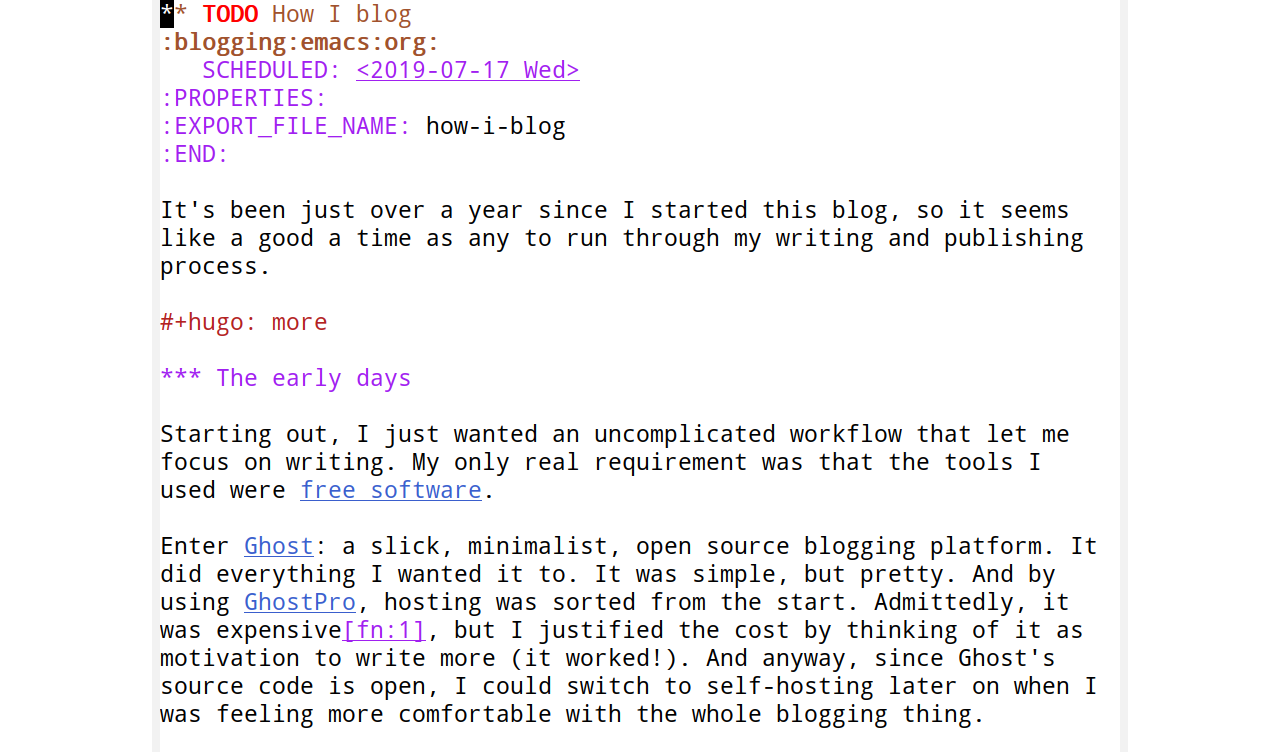
Before that however, it’s nice to preview what a page will look like. I can serve up a local version of the site by running hugo server. This can be viewed by visiting http://localhost:1313 in a browser.
 At last! It looks like a website.
Sticking it online
With the site generated, all that remains is to send it off to a server.
Running the hugo command creates a /public directory containing the contents of the site. This is what I want to send.
So, I run the script below in the same directory as my blog.
#!/bin/bash
rm -rf ./public
hugo && rsync -avz ./public/ root@fumbling.it:/var/www/fumbling.it
It removes the existing /public directory locally, creates a new one and syncs it with the /public directory on the server, applying any changes that have been made. I run it every time I create a new post or want to tweak my site.
And boom! There’s my blog. On the internet.
Closing remarks
I realize aspects of this post have been on the technical side. Hopefully, if you’ve made it this far, you’ve found it interesting in spite (or perhaps because) of this.
Ultimately though, and I can’t stress this enough, the most important thing when starting a blog is to make sure you keep writing. Endlessly searching for the perfect editor/static site generator/blogging platform/computer desk will generally leave you with very little to show. Find a workflow that just lets you write. And then write.
My blogging process, however complicated it might appear, has come about because it stays out of my way and removes as many hurdles to publishing as possible. I fire up my editor and start typing. The hard part of blogging should always be finding something important to say and putting that into words. As long as this is always the case, you’re doing something right, no matter how you get your work online.
-
The cost of a GhostPro subscription went up sometime after I purchased my annual subscription. I couldn’t afford their hosted option now. However, Ghost is very upfront that GhostPro isn’t targeted at personal/academic blogs. In these cases it’s better to self-host or use another service like Wordpress. ↩︎
-
I don’t mean crusty in a bad way. Think of it more like wholegrain bread: a little chewy from the outside, but full of goodness. ↩︎
-
While I could cut Org mode out of the equation and just create Markdown files in my blog’s
/contentdirectory, I’d be missing out on a whole lotta Org mode goodness (like easily formatted tables). But the main reason is that, because I use Org mode for so many different tasks, it’d be a hassle to switch my head to Markdown-mode whenever I wanted to write a post. ↩︎