Building a standalone IPA keyboard: Part 1 - The Prologue
I was talking with a friend the other day about how I insert special characters when typing. Naturally, this is something I do reasonably often. As I was explaining the process, I realized how disorderly my system was. It’s a bit of a mish-mash making do.
If I’m working on a word processor I often go down the ‘Insert special character…’ route. Sometimes I’ll find an IPA chart online an manually copy a character, which takes about the same amount of time. Obviously both these methods are horrendously inefficient, so I normally use them in conjunction with some liberal copying and pasting within the document. Occasionally, if I’m frequently using a small set of IPA symbols or extensions to the Latin alphabet, I might create my own shortcuts in LibreOffice.
My blog posts, on the other hand,, are written using the Emacs text editor. In this case, any Unicode symbol can be entered with a keyboard shortcut followed by a Unicode number. Although this method also seems comically impractical (it’s nine keystrokes per character), with commonly used symbols it becomes surprisingly efficient. However, having to look up a bunch of Unicode numbers for lesser used symbols is an obvious drawback. Memorizing them is also a burden.
As you can see, I don’t have a particularly fast or intuitive system for typing IPA symbols.
Possible solutions
I’ve got a few options for improving my workflow. I’ll go through pros and cons of the following in turn.
- Installing an IPA keyboard layout
- Using an onscreen keyboard
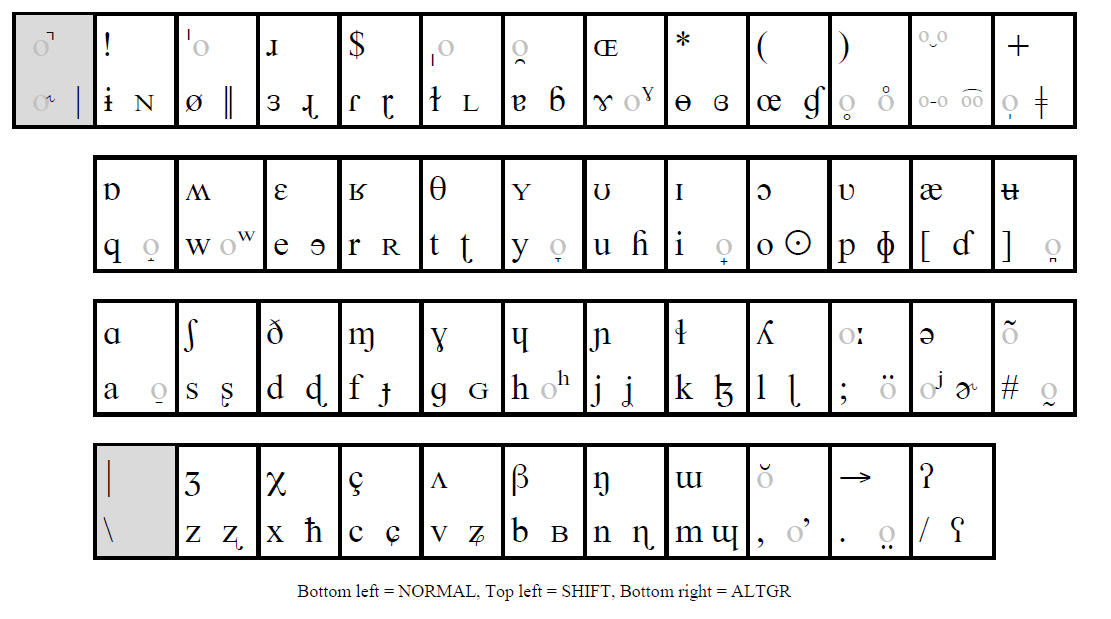
- Mapping my own layout
- Using a dedicated IPA keypad in addition to QWERTY
Installing a new layout
On a Windows or macOS machine this is dead simple. Simply install an application like Keyman and then download an IPA keyboard layout. The process is slightly more involved on Linux, but not by much. Debian and Ubuntu users can add the SIL repository to their sources list and then download a package called KMFL. Once installed, a number of layouts become available for download, one of which is an IPA keyboard. Switching to this layout is done through a through a keyboard shortcut.
Depending on the OS you’re using/your level of comfort with the command line, this can be a simple way of accessing IPA symbols. The drawback is that you need to remember a whole bunch of new shortcuts. Printing out the new layout and having it on hand is necessary early on.
Using an onscreen keyboard
This is actually pretty good. It’s a lot faster than looking things up online and means you don’t need to type any crazy shortcuts and Unicode hexes. Linux users can use an app called Onboard. While the app’s default setup doesn’t include IPA symbols, they can be downloaded here.
Personally though, I prefer to do as much work through the keyboard as possible, especially when I’m writing, so the constant switching to the mouse is a little annoying. Still, this method would be an quick fix for most people.
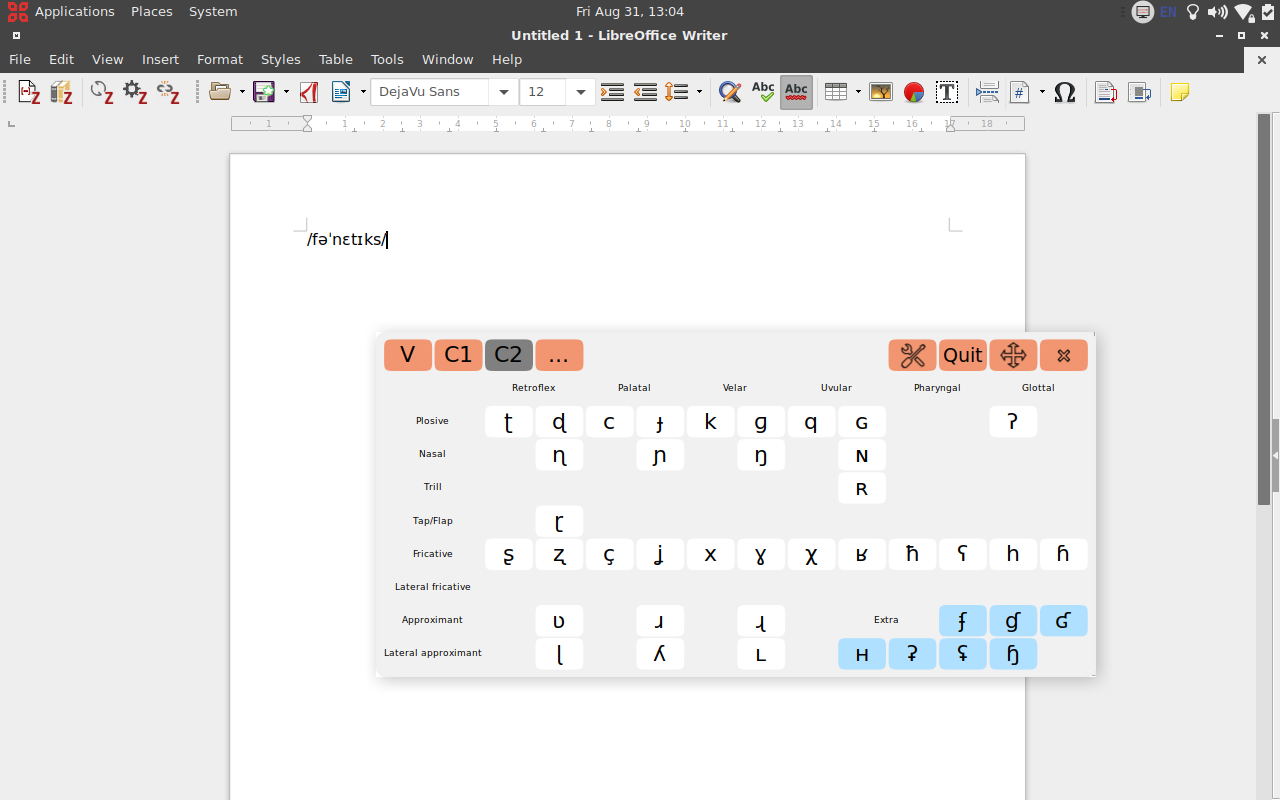
Mapping a new layout
Designing your own personalized layout is great in theory, soul-destroying in practice.
Whatever tool you use, XKB for Linux or AutoHotkey for Windows/macOS, this method is very, very time-consuming. Not only do you have to come up with a genius layout, but you have to painstakingly go through and assign all the keys and shortcuts, one by one. On top of this, you have the problem of remembering the damn layout once you’ve made it.
The advantage of this method, of course, is being able to create a keyboard that suits your needs exactly and is (hopefully) intuitive to use. But given how much of a grind it is to set up, I’m not convinced.
Building a dedicated IPA keyboard
Here the aim would be to create a small programmable keypad to use in conjunction with a regular QWERTY keyboard.
Surely this is even worse than mapping a new layout right? You have to physically build something too. Well, it’s not as daunting as it first seems.
Keypads like this are reasonably popular among gamers and heavy Photoshop users, so finding one isn’t a problem. No need to build anything from scratch.
And since the keypad is programmable, you can store whatever layout you use on the device’s internal memory. Your desktop configuration remains untouched. After this is done, the custom layout can be printed on to a new set of keycaps for reference.
One of the best things about this method is that, once the layout’s saved internally, the keypad will work with any OS. At this point, it’s just a plug-and-play device. Also, there are fewer shortcuts to learn, as the IPA symbols aren’t jostling for space with the regular keys.
Of course, the downsides of this method are the cost, time taken for planning and building, and space. Not ideal for a Linguistics 101 student, but probably justifiable for someone doing post-grad work in phonetics/phonology.
The verdict
Based on the title of this post, I’d imagine you know which option I’ve chosen.
All but the last of these methods suffer from a lack of portability. Unless you have access to the machine you’ve set up to type IPA symbols, you’re back to square one. This is particularly annoying if you’re using shared computers a lot, e.g. in a university setting.
Although it’s tempting to go with the first option, I want a system I can use anywhere on any machine. On top of that, I just can’t be bothered learning a new layout blind. I use IPA symbols often enough to need a better system, but not to the point where I would quickly internalize an extended layout. I need to see what I’m doing.
So, it looks like I’ll need to get my hands dirty.
Next steps
In the next couple of posts, I’ll document my design and build process for the keyboard. This is made up of several stages:
- Finding the right-sized programmable keypad
- Deciding on a compact, intuitive layout for the pad
- Choosing a company to print the keys
- Ordering the parts
- Assembling
- Programming
- Testing
Stay tuned for more updates!